Are you looking to give your home a fresh, new look by plastering the ceiling? If so, you’ve come to the right place. In this comprehensive guide, we will walk you through the step-by-step process of plastering a ceiling, covering everything from the materials and tools needed to the final touches. We will explore the different types of plaster that can be used, the essential tools required for the job, and the meticulous preparation needed before applying the plaster. We will delve into the application process, smoothing, and finishing techniques, as well as tips and tricks for achieving a professional and polished result. By the end of this article, you will have the knowledge and confidence to tackle your ceiling plastering project with ease.
So, let’s get started and transform your living space with a beautifully plastered ceiling.
Materials And Tools Needed
When embarking on a plastering project for the ceiling, it’s crucial to gather the essential materials and tools necessary for a successful completion.
This includes acquiring the plastering mix, which serves as the primary material for achieving a smooth and even surface. A high-quality trowel is indispensable for applying the plaster evenly and efficiently. Sanding equipment is also essential for refining the surface and achieving a flawless finish.
It’s crucial to prioritize safety, so protective gear such as goggles, gloves, and a dust mask should be worn to shield against potential hazards. With these materials and tools in hand, you’ll be well-prepared to tackle your ceiling plastering project.
What Type Of Plaster Should Be Used?
Selecting the appropriate type of plaster is a critical decision that directly impacts the overall quality and durability of the finished ceiling surface.
It is essential to consider the specific requirements of the ceiling, such as whether a smooth finish is preferred or if a textured look is desired. Skim coat plaster is ideal for achieving a flawless, smooth surface, while textured plasters offer a range of design options including swirls, stippling, or trowel finishes.
Professional-grade plastering mixes are crucial for ensuring the longevity and strength of the ceiling, and employing proper techniques during application is equally important for a professional and lasting result.
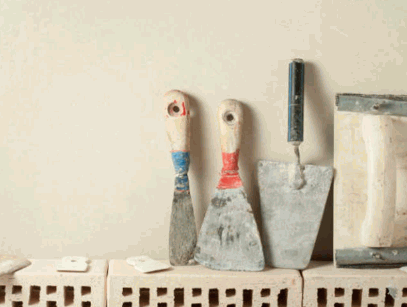
What Tools Are Needed For Plastering A Ceiling?
The process of plastering a ceiling requires a specific set of tools tailored to handle the nuances of working at elevated heights and on overhead surfaces.
Among these essential tools are trowels, which are used to apply and smooth the plaster onto the ceiling surface, ensuring a uniform and even finish. Sanding equipment plays a crucial role in refining the surface texture post-plastering.
Specialized tools designed for addressing corners, joints, and drywall applications are indispensable for achieving professional results, as they enable precise and efficient completion of intricate detailing and seamless integration of different plaster sections.
Preparing The Ceiling For Plastering
Before commencing the plastering process, meticulous preparation of the ceiling surface is indispensable to ensure flawless application and durable results.
This preparation involves addressing any patches, cracks, or imperfections in the ceiling.
First, any small patches or holes should be filled and smoothed out using a suitable patching compound.
Next, any cracks in the ceiling should be properly addressed and reinforced to prevent future cracking.
Once the surface is smooth and free of imperfections, a coat of high-quality primer should be applied to optimize adhesion.
This primer serves as a crucial layer that enhances the bond between the plaster and the ceiling surface, ensuring a long-lasting and professional finish.
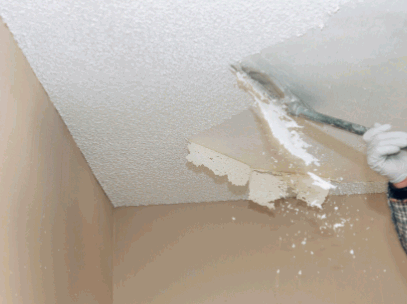
Removing Old Plaster
The removal of old plaster from the ceiling demands a systematic approach and professional precision to ensure a clean and even surface for the subsequent plaster application.
It is crucial to begin by assessing the condition of the existing plaster and identifying any areas that require significant repair. Once the assessment is complete, the process of removing the old plaster can commence, employing techniques such as scraping, chiseling, or using chemical solutions for stubborn areas. Careful attention must be paid to maintain uniformity on the surface, minimizing any irregularities that could affect the final finish. Proper safety precautions and equipment must be utilized throughout the removal process to ensure a smooth and efficient execution.
Cleaning And Repairing The Ceiling
Thoroughly cleaning and repairing the ceiling is a pivotal preparatory step, involving the utilization of appropriate tools, adhesives, and waterproofing measures for optimal surface readiness.
This process typically starts with removing any accumulated dirt, dust, or debris from the ceiling surface using a vacuum cleaner or soft-bristled brush. Next, any cracks or holes should be properly filled and repaired using a spackling compound or joint compound.
Waterproofing materials such as sealants or waterproof paint can then be applied to enhance the ceiling’s resistance to moisture. Adhesive applications with specialized tapes or sealants may also be necessary for securing loose material or repairing damaged sections, ensuring a durable and aesthetically pleasing outcome.
Dig Deeper: How To Repair Plaster Holes In Wall
Applying The Plaster
The application of plaster onto the prepared ceiling surface represents a pivotal phase that demands precision, technique, and the right materials for achieving an impeccable finish.
This process typically begins with thoroughly preparing the ceiling surface by addressing any joints, cracks, or imperfections. It is essential to apply a bonding agent before plastering to ensure proper adhesion. The technique used for applying the plaster, whether troweling or spraying, will significantly impact the final texture. Many options are available for achieving different textures, including smooth, textured, or swirl designs.
Proper patching of any irregularities and imperfections is crucial for a flawless end result.
Mixing The Plaster
The process of mixing plaster for ceiling application necessitates a precise approach to achieve the ideal consistency and resilience, incorporating waterproofing measures for enhanced durability.
It is essential to use a high-quality professional-grade plastering mix to ensure a smooth and long-lasting finish. Consistency in the mixture is crucial to avoid any lumps or air pockets, which can affect the final result. Adding waterproofing agents such as acrylic modifiers or admixtures can further enhance the plaster’s resistance to moisture and humidity, making it suitable for areas prone to water exposure.
By paying attention to these details, the plastered ceiling can not only look impeccable but also offer lasting protection.

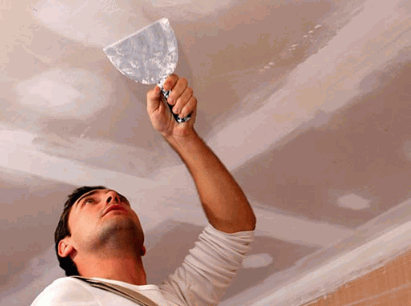
Applying The First Coat
The initial application of the first coat of plaster onto the ceiling sets the foundation for a smooth and resilient surface, requiring meticulous attention to addressing patches and optimizing surface adhesion through priming.
This intricate process involves a skillful technique to evenly spread the plaster, ensuring uniform coverage across the ceiling. Prior to application, any imperfections or gaps in the surface must be carefully filled and leveled to create a seamless finish.
The use of a high-quality primer plays a crucial role in preparing the surface, enhancing its bond with the plaster for improved durability and longevity. By following these steps, the first coat of plaster not only provides structural integrity but also establishes a flawless canvas for subsequent finishing layers.
Applying The Second Coat
The application of the second coat of plaster represents a pivotal stage that demands finesse, blending, and feathering techniques to achieve a seamless and refined surface finish.
This stage requires meticulous attention to detail, as the second coat serves to build upon the initial layer, necessitating careful smoothing and blending to eliminate any imperfections. Feathering techniques are crucial in ensuring a smooth transition between layers, allowing for a uniform and aesthetically pleasing result. By employing these techniques, the surfaces are transformed into a cohesive and flawless canvas, ready for the final stages of finishing.
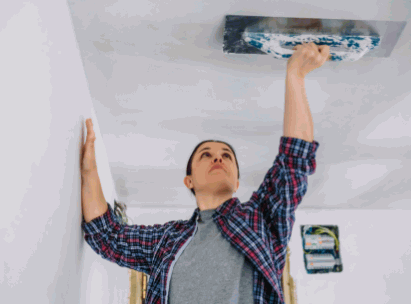
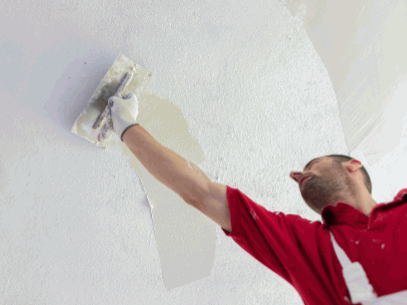
Smoothing And Finishing The Plaster
The process of smoothing and refining the plastered surface entails the skilled use of a trowel to achieve a seamless texture and blending to enhance the visual appeal of the ceiling.
This involves carefully manipulating the trowel over the plastered surface, and applying just the right amount of pressure and angle to achieve a uniform finish. Texture options, such as smooth, semi-smooth, or textured, are determined by the choice of trowel and the method of application.
Blending methods are crucial for seamlessly merging new plaster with the existing surface, ensuring a cohesive and polished look. Understanding these techniques and considerations is vital for professionals and DIY enthusiasts to create a beautifully finished plaster ceiling.
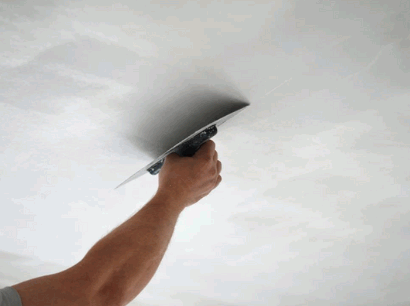
Using A Trowel To Smooth The Surface
The utilization of a trowel in smoothing the plastered surface of the ceiling demands precision, uniformity, and adept edging techniques to achieve a consistent and aesthetically appealing finish.
Such precision is essential to ensure that the surface is free from irregularities, ensuring that light reflects evenly across the ceiling. A skilled hand with the trowel can expertly navigate corners and edges, creating seamless transitions between sections.
Surface uniformity is achieved through careful attention to pressure and angle, smoothing out imperfections while maintaining an even thickness of the plaster. These nuances, when mastered, result in a beautifully finished ceiling that enhances the overall aesthetic of the space.
Creating A Textured Finish
The creation of a textured finish on the plastered ceiling presents an opportunity to enhance the aesthetic appeal and incorporate moisture-resistant properties for long-term durability.
This can be achieved through careful consideration of the texture techniques and materials used. Applying a textured finish not only adds visual interest but also serves practical purposes by concealing imperfections and reducing maintenance.
When selecting materials, components with moisture-resistant properties should be prioritized to ensure the longevity and structural integrity of the ceiling. Various texture techniques such as swirl, skip trowel, or stomp can be employed to achieve unique finishes, each offering distinct visual and tactile effects.
Drying And Sanding The Plaster
The drying and sanding phase of the plastering process is critical for achieving a smooth, uniform surface, requiring meticulous attention to drying times and precise sanding techniques.
This phase is crucial as it directly influences the overall finish and durability of the plastered ceiling. Proper drying times ensure that the plaster sets evenly and reduces the risk of cracking or uneven texture.
Effective sanding methods are essential to eliminate any imperfections, achieving a clean and flawless surface. By prioritizing these processes, professionals can deliver a high-quality finish that enhances the aesthetic appeal of the room, offering a seamless and long-lasting result.
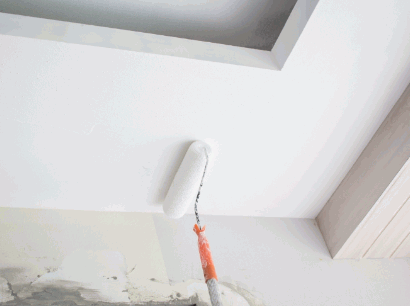
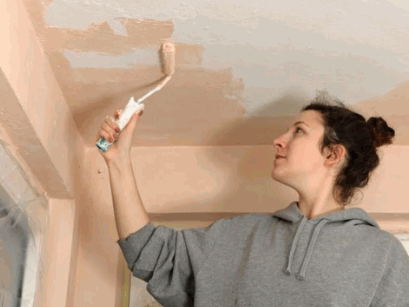
Painting The Plastered Ceiling
Once the plastered ceiling has dried and been thoroughly sanded, the painting process can commence, involving meticulous preparation, priming, and the selection of appropriate painting tools.
Prior to painting, it is essential to ensure that the ceiling is free of dust and debris. This may involve using a vacuum or a damp cloth to wipe down the surface. Next, applying a high-quality primer specifically designed for plaster surfaces is crucial to ensure the paint adheres effectively. Choosing the right painting tools, such as a roller for larger areas and brushes for intricate details, is also important.
Properly preparing and priming the plastered ceiling will lay the foundation for a smooth and durable painted finish.
Tips And Tricks For A Successful Plastering Job
Incorporating strategic tips and expert tricks can significantly enhance the outcome of a plastering job, ensuring comprehensive coverage, efficient cleanup, and adherence to safety precautions.
These insights can help professionals and DIY enthusiasts achieve a smooth and durable finish. Prior to starting the plastering process, it’s crucial to prepare the work area by covering floors and furniture to prevent splatter. Wearing protective gear, including gloves and goggles, is essential to safeguard against potential hazards. Following proper ventilation protocols and utilizing the right tools and materials further contribute to a successful plastering job. A thorough cleanup post-plastering guarantees a tidy workspace and professional results.